I have recently started redoing all of my old videos. Bobbles is one of those videos. It was long and extremely boring, on top of being pretty hard to see. This new video is still a tad on the long side, but at least now it is very clear! And instead of written instructions scrolling through the video, I am putting them up here. Hope everyone likes the new bobble video!
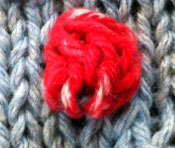
There are no set rules for bobbles, really. You can make as many as you want, big or small, different colors (as in the photo above), and they can be placed anywhere you like. If you are following a pattern, it will undoubtedly tell you where to place the bobbles, and how to make them.
Below are a few ways I know to make bobbles, and I am sure there are more methods floating around out there. They all have a slightly different look, but the method of making them is really the same : increase into the next stitch, turn and purl, turn and knit, decrease. And there is your bobble. The typical bobble is 5 stitches, but you are free to experiment. The video demonstrates stockinette fabric and bobbles, but you can really do anything with them. Maybe garter fabric with a stockinette bobble, or the other way around. Why not a seed stitch bobble? Use bobbles as buttons. Your only limitation is your imagination.
Decide where you want a bobble. Into the next stitch, increase using any of the following methods:
1) K1, P1, K1, P1, K1
2) K1, YO, K1, YO, K1
3) KFL, KBL, KFL, KBL, KFL (Knit front/back loop)
Then, turn your work and purl those same five stitches. Turn again and knit. You can stop here, or purl/knit again. The more times you do this, the puffier your bobble will be.
Now, you need to decrease back to one stitch, using any of the following methods:
1) Pass second stitch over first, pass third stitch over first, etc. until all extra stitches have been passed over the first
2) After you have purled and are ready to knit the stitches : K2tog, K1, K2tog, then pass the two remaining stitches over the first
3) Pass the second and third over the first together, then pass the fourth and fifth together over the first
4) Once you have purled/knit as many times as you like, continue knitting to the end of your row. You will make your decreases on the wrong side of the fabric. When you come to the bobble, simply purl all of the extra stitches together. Obviously, this could become difficult if you have chosen to use more than five stitches for your bobble. I wouldn't recommend this decrease for more than five stitches.
And of course, here is the video! Happy Knitting and Enjoy!