 |
| Before blocking |
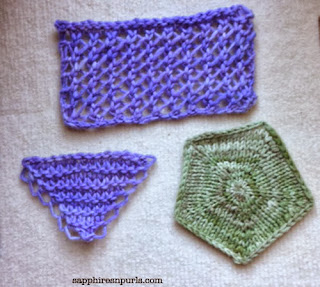 |
| After blocking |
Blocking is like swatching for a lot of knitters - nobody really wants to do it, or understands why it is necessary. Just look at the pictures above, and that should be reason enough to convince you that you should block your knitting (or crochet, for that matter).
Blocking opens up the stitches, evens them out, and allows you to shape the fabric. It also makes the fabric drape better and gives it an airier feel.
In the above pictures, you can see what a difference blocking has made. The lace stitch of the rectangle is visible; the loops of the triangle are more pronounced; and the pentagon actually looks like a pentagon!
While all of my samples were knit with 100% wool (because that is what I knit with about 90% of the time, or another animal fiber), you can and should block other fibers.
I know it can seem like a hassle to take the time to block a lace shawl, when all you really want to do is put it on! But, if you've spent days, or even weeks, on a beautiful lace shawl, then a little more time to block it isn't going to make much difference -- except that your lace will look absolutely beautiful!
Below are some links with info on how best to block particular fibers (not all fibers may hold up well to wet blocking, or steaming may not be best for another), as well as links to where you can find out more about and purchase blocking materials.
You really don't have to have a blocking board to pin your item out on, a spare bed or even the floor will do nicely. So long as it is a place where no cats, kids, or meandering significant others will disturb it, you can pin out your projects just about any place.
Below is also a video I made, showing three different methods of blocking the above samples: wet blocking for the rectangle, pin and spritz for the triangle, and steam blocking for the pentagon.
Since you will be knitting a swatch anyhow to check for gauge (you are going to swatch, aren't you?), and plan to block your finished item, you should block your swatch also; it's a good time to see what your fabric looks like with the chosen method of blocking.
I am just using pins in this, if I find the time in the future, I will show you blocking wires. Essentially, you just weave your wires along the edge of the knitting, then place your pins along the inside edge of the wires to block. Blocking wires eliminate the amount of pins you will need to use along straight edges.
More info on which method to use on which fiber:
Blocking materials:
These are not the only products, or the only place to buy products. I do encourage shopping around, check local craft or yarn shops, ask around on knitting boards, etc.
Finally, here is the video.


