This is an excellent cast on for flat k2 p2 ribbing that creates a neat, tidy edge. Not quite as flexible as the k1 p1 tubular cast on, but much more flexible than regular long tail cast on. The tubular cast on eliminates the ridge along the bottom edge created by the regular long tail cast on, and creates instead an edge that resembles fabrics on store-bought items. If you want to add a more professional look to your knits, this is a great cast on to use.
You will need some waste yarn in a contrasting color that is the same weight as your project yarn. You can also use a lighter weight yarn if that is all you have on hand. Preferably, the waste yarn should be smooth to make removing it easier.
A refresher on 2x2 Ribbing:
**Multiple of 4 - this will result in one edge of the fabric being k2 and the opposite edge being p2
Row 1: k2, p2
Repeat for pattern
**Multiple of 4 + 2 - this will result in both edges of the fabric being k2
Row 1: *k2, p2; rep from *, end k2
Row 2: *p2, k2; rep from *, end p2
Repeat these two rows for the pattern
Step 1: With the waste yarn, cast on about half the required number of stitches. You can use any cast on you like. Knit a row, then purl a row. At this point, you can cut the waste yarn and introduce your project yarn to continue working in stocking stitch for three more rows. You should end with a knit row.
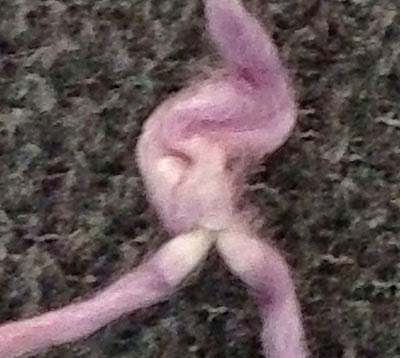
Step 2: The next row should be the wrong side of the stocking stitch fabric, and you should easily be able to see the purl bumps created when you began working with the project yarn. It is these purl bumps that will be picked up as the row is worked - - this is why you want to use contrasting yarns, otherwise it will be rather difficult to see to pick up stitches. In the picture below, you can clearly see the row of purl bumps in blue yarn on my sample.
 |
| row of purl bumps to be picked up |
 |
| picking up a purl bump with right needle |
| transferring the picked up purl bump to the left needle |
 |
| waste yarn can be removed by unraveling either the cast on tail or the tail cut before joining the project yarn |


.JPG)

.JPG)